
SILENT HILL: Townfall The Weight & Final Boss Guide
Escape the roaming Weight, then finish the final boss with three close-range removals. Includes checkpoints, recovery advice and the announced balance update.
- Location:
- SWDP – Different; Clara Woods – Different
- Part:
- Simon
This page reveals story details. Show spoiler content? Show spoilers
Pick the problem you need to solve
- Being chased or unable to reach the controls? Go to the SWDP access route.
- At the final fight, but the encounter will not finish? Go to the interaction checkpoints.
- Need a diversion before moving? Read escape opportunities.
The route below separates reaching the control room from solving its console. Do not spend ammunition trying to turn the earlier pursuit into the final fight.
First decide which encounter you are in
The roaming stalker and the final boss require different decisions. In SWDP, your job is to reach controls and open the route. Chapter 16 instead requires finishing an encounter to advance the story. “Cannot kill it here” does not mean “there is no boss fight later.”
| Situation | Your objective | What this guide can establish |
|---|---|---|
| Pursuit while exploring | Get to the next door, item or control | Release-review survival observations and the SWDP access route |
| SWDP power restored, Chapter 15 | Reach the JOE room and Control Room | Generator trigger and a reported Flare Gun stun |
| Eraser, Chapter 16 | Complete the final confrontation | Three-removal objective and video checkpoints; no measured damage table |
Recognizing the threat
VGC describes a bulky figure burdened by a mass on its back, with lethal close contact. Its review treats the roaming form as effectively invulnerable. This is the reason to budget a distraction for passage rather than emptying your ammunition into a corridor encounter. Neither that review nor this site provides a measured health value, stun duration or guaranteed safe distance.
A balance update for The Weight has been announced
Screen Burn’s official post on 30 September 2026 acknowledged “struggles with The Weight” and said “gameplay balancing on its way ASAP” (reported by VGC). The same post announced PC patch 1.3.1, which targets stuttering — not enemy behavior. At our last check on 4 October 2026 the balance update had no release notice in the official Steam feed, so this page describes the launch and 1.3.1 versions. When the balance patch ships, re-check pursuit behavior and the final encounter against this page before trusting old timings or positioning advice.
Recover the route after a failed attempt
Before retrying, identify the next objective from the access table below. After loading a save, recheck the key or card you actually possess rather than assuming every action before the death was saved. If the access card is absent, follow the JOE-room pickup route again; if you have it, check the reader’s power before retracing the whole section.
For being spotted, a blocked hiding-place exit or danger immediately after revival, use the spoiler-light recovery table. These checks help separate missing progress from an obstructed escape; they do not claim to reset the enemy or fix a confirmed bug.
Make an escape opportunity
- Identify the destination before drawing attention. A diversion is useful when you already know which doorway or corner it lets you reach.
- Throw toward a route you do not need. Bottles and bricks can redirect attention; the GamesRadar review describes using noise to get past the stalker. Reaching the impact point is not a promise that it stays there.
- Break sight, then keep moving. Turning one corner is a chance to relocate, not an invisible boundary enemies cannot cross.
- Treat a hiding spot as temporary cover. VGC observed it lingering outside lockers. Wait for a real opening instead of assuming a fixed countdown makes leaving safe.
The same review reports light drawing attention and an IV revival followed by another immediate death nearby. Our practical recommendation is to turn off unnecessary light during concealment and plan an exit before relying on a revive. These are responses to reported encounters, not a universal AI formula. The hiding rules and IV Bag guide explain the underlying tools.
SWDP: power, JOE key, Control Room
In Chapter 15, pulling the generator’s red handle restores power and brings the roaming threat into the route. AllThings.How reports that a Flare Gun hit can stun it long enough to move upstairs. This supports using a flare to create space; it does not establish that the stalker can be killed here.
Follow the Part 6 access steps: JOE Key, southwest JOE door, wall gap, Access Card, then the powered shutter reader beside the clamps. Get the card before repeatedly testing the reader. If you collected the optional Locker 75 Flare Gun, reserve ammunition for a blocked route rather than testing enemy health.
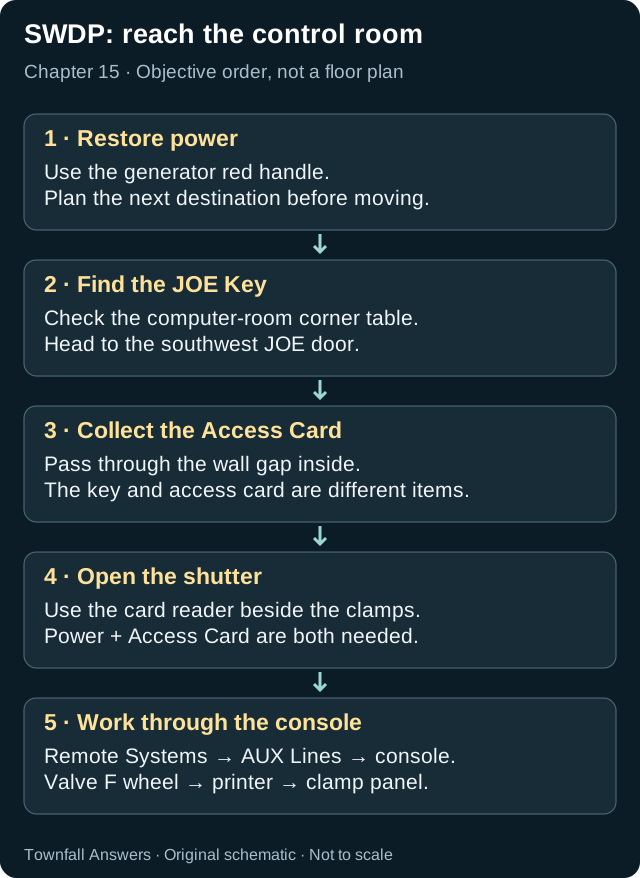
SWDP access checkpoints — original schematic, not to scale.
Original guide diagram — not an in-game screenshot. Evidence and detailed steps are listed in this guide.
Open full-size diagram| What is blocking you? | Check before retrying |
|---|---|
| Shutter reader has no power | Return to the generator step |
| You have the JOE Key but the shutter stays shut | The key opens the JOE door; collect the Access Card beyond the wall gap |
| You are inside, but do not know the console command | Follow Remote Systems |
| The console sends you out for AUX | Take locker 0825’s key, complete Auxiliary Lines, then return |
| Valve F opens but the chapter does not advance | Use its wheel downstairs, collect the printed instructions and follow Clamp Release |
These checks follow the documented objective chain; they are not fixes for an established game bug.
Final encounter: three removals, then the return
Chapter 16 takes the confrontation to Clara Woods – Different. Defeating The Weight awards Eraser; the earlier SWDP machine sequence awards Can’t Change Things. The roaming encounter’s escape rule does not apply as the win condition here.
Before committing: supplies and space
Bring ammunition and a healing reserve, then look for pickups around the arena. Dan Allen Gaming’s PS5 recording visibly collects shotgun rounds at 18:05. That confirms a pickup in this run, not infinite ammunition or an automatic refill after every removal. Keep track of the central monument, planters and a route around approaching enemies so you can move while reloading. These objects help you reposition; they are not guaranteed safe spots.
First cycle: damage, approach, interact
PPE.pl recommends a Flare Gun stun followed by damage. The PS5 video shows flare-gun handling and shotgun combat; bring the tools you actually have rather than copying the special green-energy weapon in the speedrun. The optional Flare Gun is an aid, not established here as the only way to win.
When the boss staggers into its interaction state, move close to the marked point and complete the removal prompt. Merely shooting from a distance does not perform this story interaction. The PowerPyx recording shows an R2 prompt during a removal; follow your own on-screen binding rather than assuming the same key on PC or a remapped controller.
Second cycle: recover and make another opening
Control returns after the interaction and its story transition. Reposition, reload, and deal with enemies blocking the approach before concentrating fire on the boss again. The ordinary-weapon video shows both reloading and healing during the encounter; it is not a no-damage demonstration.
Trigger the next close-range opening and complete the second removal. A stagger or an intervening flashback is not the victory trigger. PPE.pl’s three-removal description is consistent with the successive interaction windows and ending transition reviewed in the videos.
Third cycle: finish the interaction, then continue the story
Repeat the damage-and-approach sequence for the last removal and let the resulting transition finish. This is a progression guide to three repeated objective cycles, not a claim that each cycle introduces a named new move. The PowerPyx route changes to Chapter 17, Returning at 1:56:36.
Final fight not ending: check the interaction
| What you see | Next check |
|---|---|
| The boss staggers but you keep firing from a distance | Approach the marked point and look for the removal prompt |
| A story transition ends and control returns | Prepare for the next damage-and-interaction cycle |
| Other enemies block your approach | Make space before reloading and approaching again |
| A guide shows much faster damage | Check whether it uses the NG+ Pistol-3000; it is not a normal-weapon benchmark |
Use the recorded checkpoints below to compare the objective state, not to copy an exact shot count or a guaranteed safe position.
Watch the ordinary-weapon fight
Dan Allen Gaming labels this recording as PS5 footage followed by the Abandoned ending. The player below opens during combat. Our checkpoint labels identify inspected moments, not creator-supplied chapter markers. The ending belongs to this recorded run; beating the boss does not guarantee that ending for everyone. Major finale spoilers follow.
Compare the three interaction checkpoints
The shorter PowerPyx footage is useful for locating interactions. Its green-energy weapon setup is not a benchmark for ordinary pistol or shotgun damage. The approximate windows below are navigation points, not measured stun durations.
| Recorded checkpoint | What to look for |
|---|---|
| 1:55:01 — first close interaction | The camera moves into the boss after the opening attack sequence |
| 1:55:41 — removal prompt | Hands on the object and a visible R2 prompt during the next removal |
| 1:56:11 — final approach | Another marked interaction before the final transition |
| 1:56:36 — Returning | The creator’s next-chapter boundary after the encounter |
Evidence scope: the sequence, selected interactions, weapon handling and a supply pickup were visually checked against the recordings. Difficulty, patch version, exact health, shot counts, guaranteed item respawns and a complete attack timing table were not established. These are source-checked video observations, not our own completed playtest.
After the fight
Prepare ammunition and a separate manual save before committing, unless you are specifically doing Reject The Help. After the fight, continue into Chapter 17, Returning: the shoreline Crew Patch still matters for all documents. Do not stop your collection checklist at the Eraser trophy.
For a later replay, the Sci-fi route can bypass the standard finale, but requires its own NG+ prerequisites. It is not a substitute for earning Eraser on a normal story completion.
Related Articles
guide Source-reviewed
SILENT HILL: Townfall Combat & Stealth — Fighting, Hiding and Distractions
walkthrough Source-reviewed
SILENT HILL: Townfall Part 6: Simon Walkthrough — Route & Checkpoints
CEG HQ – Different and SWDP – Different
guide Source-reviewed
SILENT HILL: Townfall Healing & Crafting Guide
Did this guide help you?
JavaScript is needed for these buttons. You can still send a correction using the link below.
Send a correction or missing detail