
SILENT HILL: Townfall Part 5 Richard Walkthrough
Part 5 CEG HQ route: read the yard emails before the lift, enter through the scaffold window, collect projector parts and reach the CEO elevator.
- Location:
- CEG HQ
- Part:
- Richard
- Chapter:
- Part 5 — Chapters 12-13: Getting Inside, Another Attempt
What does Part 5 cover?
Part 5 (Richard) spans Chapters 12 (Getting Inside) and 13 (Another Attempt), set inside and around the CEG HQ tower. The critical path involves restoring exterior power, collecting three projector components across floors 3-5, solving two boardroom puzzles, and reaching the 10th Floor elevator.
A second view of Richard from the official cast-reveal release.
Official promotional screenshot · Published
© Konami Digital Entertainment / Annapurna Interactive / Screen Burn
What is the critical path?
| # | Objective | Required gate |
|---|---|---|
| 1 | Security booth button → Manager’s Office cabinet → Generator Key | Exterior approach |
| 2 | Exterior generator: rear levers, then red lever | Generator Key |
| 3 | Read both exterior computer emails before the lift | Power restored |
| 4 | Construction lift → scaffolding → open window; Shotgun on 2F | Exterior sweep complete |
| 5 | 5F Boardroom sequence → Level 3/4 Access Card | Story progression |
| 6 | 3F P.R. route → 4F Media → Storeroom Key → Projector Bulb | Level 3/4 card |
| 7 | Read Checkout Sheet → Finance 2709 → CFO desk Projector Lens | Card and Finance clue |
| 8 | Boardroom: Bulb → Lens → red switch | Both components |
| 9 | Take Maintenance Key from the body at the table | Initial projector sequence |
| 10 | Use Maintenance access to reach the Mezzanine Meeting Room → Projector Sliders | Maintenance Key |
| 11 | Boardroom: agenda / slides D-F-B-C-E-A → CEO Access Card | Slides and agenda |
| 12 | Finish the floor sweep, then use the CEO elevator to 10F | CEO Access Card |
The projector guide explains the two separate visits. Maintenance Key comes before the Mezzanine slides, not after the final slide puzzle. Do not confuse it with the earlier Storeroom Key.
Before the exterior lift: read both computer emails
Restore power, then return to the first parking-lot building before riding the construction lift. Use the computer in its right-hand room and read both Facilities: Works Halted (top email) and DONTREAD.DOC (bottom email). These are Part 5 entries 4 and 5 on the Documents checklist.
PowerPyx added this warning after a player reported passing the exterior pickups and losing the return route at an autosave. Complete this check in the yard; the later CEO-elevator sweep does not replace it. On a Reject The Help run, keep the pickup check but continue avoiding manual saves.
How do I enter CEG HQ from the scaffolding?
- After checking the two emails, return to the powered construction lift. Select Power, then the up arrow.
- Exit onto the scaffold walkway and follow it left to the ladder route. Continue along the connected platforms and ladders toward the building.
- Find the already open window at the end of that approach and crouch through it. AppMedia’s entry screenshot shows the opening beside the scaffold walkway; a closed pane of glass is not that pictured entry.
- Once inside, take the door on the left to continue to the 2F sequence, then follow the main route toward the 5F Boardroom.
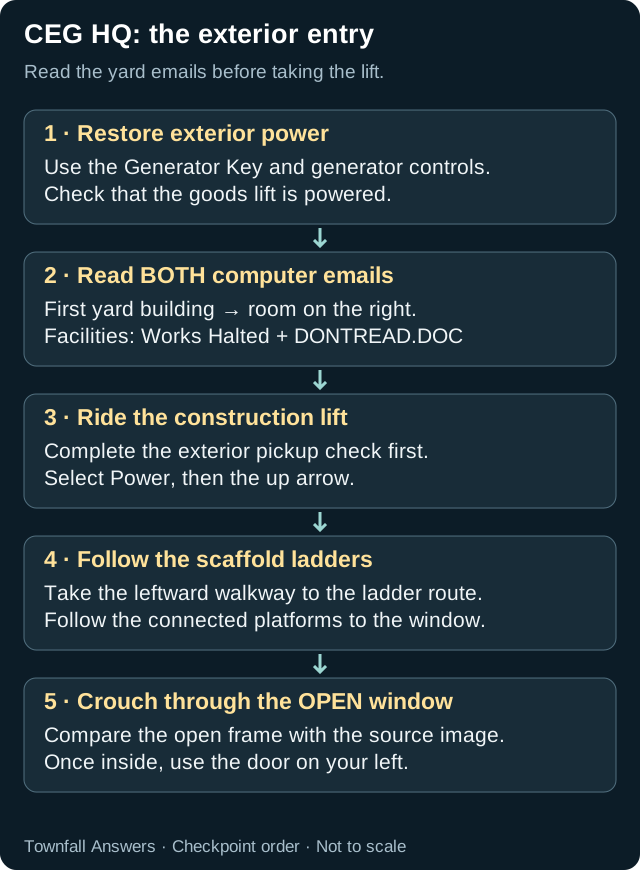
CEG exterior entry — original checkpoint diagram, not to scale.
Original guide diagram — not an in-game screenshot. Evidence and detailed steps are listed in this guide.
Open full-size diagramFacing a closed window? Recheck the connected scaffold route and locate the open frame before diagnosing a broken save. The diagram shows checkpoint order, not exact platform geometry. Written accounts differ on the first ladder’s up/down wording, so compare the AppMedia entry image with your position; this guide does not prescribe an unverified climb direction.
CEG floor route: which key opens the next stage?

Original Part 5 floor and key route — not to scale
Original guide diagram — not an in-game screenshot. Evidence and detailed steps are listed in this guide.
Open full-size diagramRead the numbered route above alongside this diagram. There are three Boardroom stages: take the Level 3/4 card, assemble the projector to obtain the Maintenance Key, then return with the slides for the CEO card. The Storeroom Key, Maintenance Key and CEO card each open a different gate. The floor connections were rechecked against PowerPyx on 25 September; this is a progression diagram, not a surveyed floor plan or the altered CEG sequence from Part 6.
What can be missed in Part 5?
Use two checkpoints: collect the five exterior entries before the construction lift, then sweep the tower floors before the CEO elevator to 10F. Read CEG Tower: He’s Done at the 10F computer after riding it. Part 5 collectibles total 12 Documents and Clues. The Shotgun and optional supply rooms are separate from that collectible-family total. The supply-room codes below are not the Finance code and do not replace its clue.
The tower also introduces the Widow enemy reference. If working on combat counters, consider your ending plan before adding kills. Keep a phone save before the transition unless doing a no-manual-save challenge.
Optional supply rooms (not required for the story)
Three locked supply rooms around CEG HQ hold resources only — none gates the main route, and skipping all three costs nothing but loot. Each opens with its own keypad code; PowerPyx attributes all three to Richard’s Note:
| Room | Floor | Code | Where the code comes from | Contents |
|---|---|---|---|---|
| Public Relations Records | 3F | 1607 | Richard’s Note, found in the 3F P.R. area | Supplies |
| Operations Storage | 2F | 1306 | Richard’s Note; reach Operations through Maintenance first | Resources |
| Administration Storage | 1F | 4512 | Richard’s Note; door in southeast Administration | Resources |
Evidence rechecked 25 September 2026: PowerPyx’s Part 5 page is now accessible and was read directly. It confirms 3F P.R. Records 1607, 2F Operations Storage 1306 and 1F Administration Storage 4512, all resources-only rooms. This replaces our earlier operator-transcribed evidence note; it remains one publisher’s walkthrough, not our playtest.
What comes after Part 5?
Part 6 (Simon) is the final part, covering Chapters 14-17 across the SWDP building and the chapter’s ending sequence. Continue with Part 6: Simon.
Collectible progress — Part 5
Track this Part without leaving the walkthrough. These grouped lists share saved ticks with the full collectible guides; they are not a claimed shortest route.
Documents & clues · 12 items
Clear the ticks in this list? Other lists and Parts outside this view are kept.
Locations are available below. Enable JavaScript to use the manual progress tracker.
No items match this view.
Manual notes only. This does not read a game save, sync with Steam or PlayStation, or verify a trophy. Saving is optional and stays in this browser.
Open the full collectible guideRelated Articles
code Verified
SILENT HILL: Townfall Finance Room Code (2709) & Projector Lens
CEG HQ — ground floor, Finance Room door
puzzle Source-reviewed
SILENT HILL: Townfall Projector Puzzle — Parts & Slide Order
CEG HQ — 5th Floor Boardroom
puzzle Source-reviewed
SILENT HILL: Townfall CEG Generator Puzzle Solution
CEG HQ — Exterior, generator area
Did this guide help you?
JavaScript is needed for these buttons. You can still send a correction using the link below.
Send a correction or missing detail