
SILENT HILL: Townfall Blood Transfusion Puzzle & Blood Bag Locations
Find the five blood bags in the altered ward, open the S.W. and D.P. doors, then route only the matching blood-type lines to finish the transfusion wall.
- Location:
- St. Amelia Medical Center — Different (altered ward)
- Area:
- St. Amelia Medical Center
- Part:
- The Patient
- Chapter:
- Part 3 — Chapter 8, Many Into One
Quick solution: Sarah Watson + Matthew Clark left, George McEwan right, then O−/O+/A−/A+ routing
This page reveals story details. Show spoiler content? Show spoilers
What is the blood transfusion sequence?
In the altered Medical Center, you collect five named blood bags scattered through the changed ward, use two of them to power open blocked doors, then solve a wall-mounted placement and line-routing puzzle to finish the chapter segment.
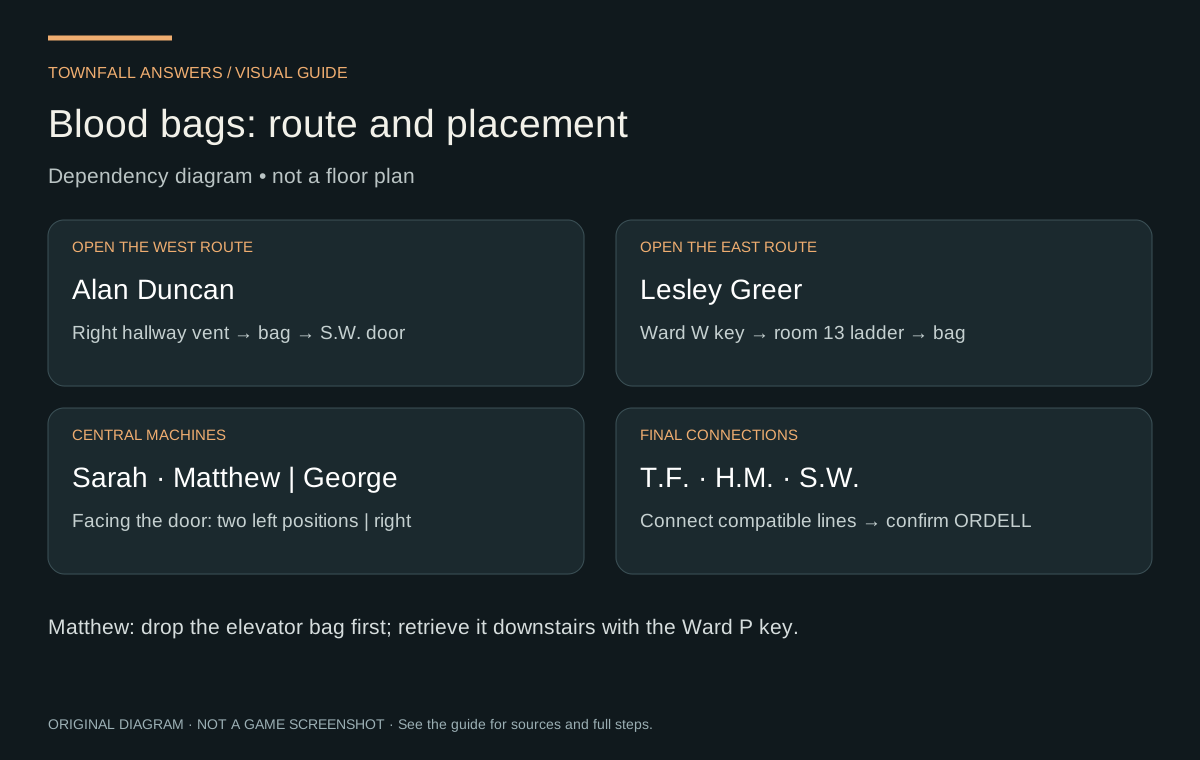
Blood bags: route and placement
Original guide diagram — not an in-game screenshot. Evidence and detailed steps are listed in this guide.
Open full-size diagramWhere are the blood bags?
| Bag | Where it is found |
|---|---|
| Alan Duncan | Left of a bed after squeezing through a vent, right hallway |
| Sarah Watson | Ward S, room 05, beside the bed |
| Lesley Greer | Ward S, room 12 — reached via the ladder from Ward W room 13 |
| Matthew Clark | Dropped via the elevator from Ward D room 02, retrieved from between the elevator doors in Ward P room 03 |
| George McEwan | Ward P, room 10, lower floor |
Keys that unlock the bag route
Take the Ward W Master Key in room 04 before the room 13 ladder route to Lesley in room 12. George McEwan in Ward P room 10 also has the Ward P Master Key; use it for room 03 when retrieving Matthew’s bag from the elevator doors. Do not keep testing those doors with only a blood bag in inventory. The Part 3 route places these pickups between the surgery sequence and the final wall.
West ward map: S05 → W04 → W13 → S12
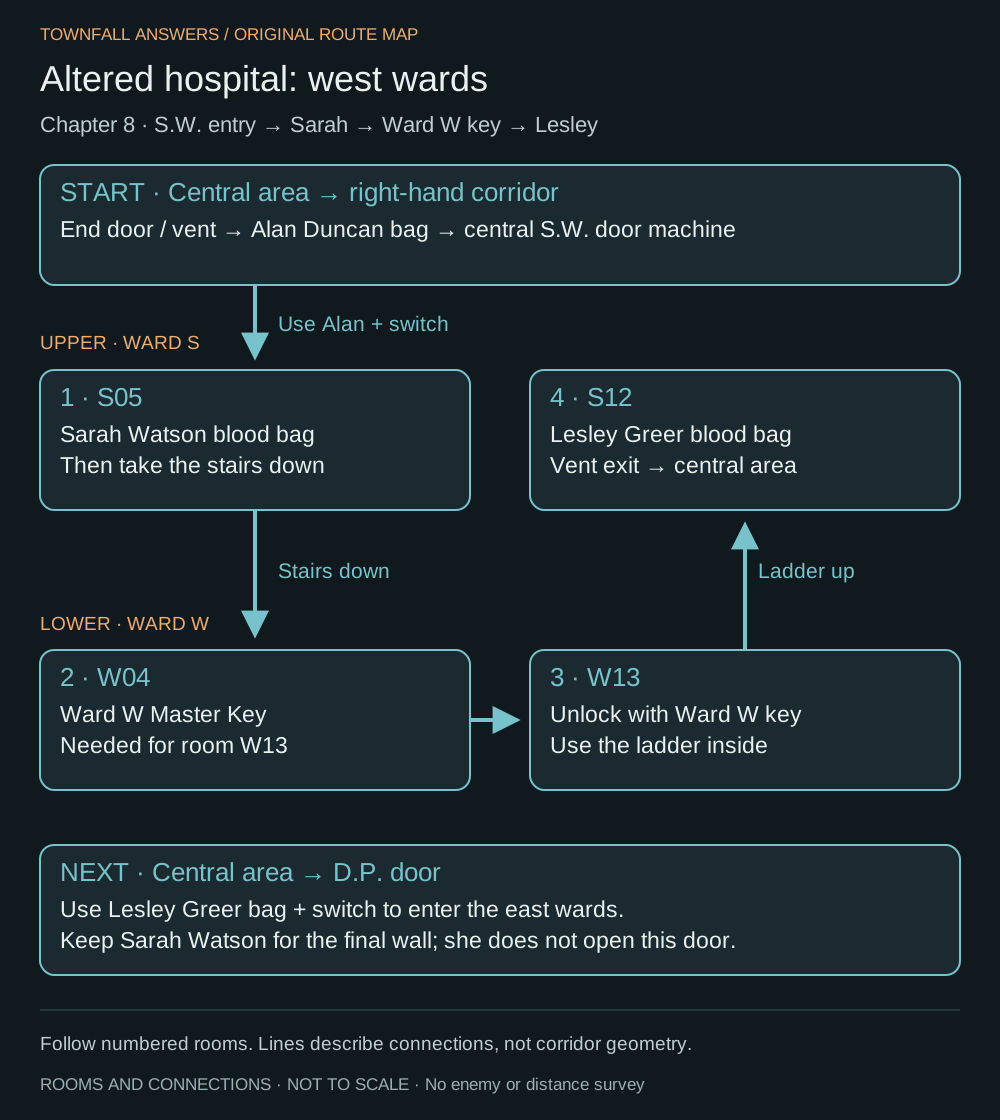
West wards: room connections and key dependency — not to scale
Original guide diagram — not an in-game screenshot. Evidence and detailed steps are listed in this guide.
Open full-size diagramAfter opening S.W., take Sarah’s bag from S05, go downstairs for the key in W04, unlock W13, then climb its ladder into S12 for Lesley. Leave through the vent and return to the central area. The room prefix matters: W13 and S12 are on different floors.
East ward map: elevator, floor hole and both valves
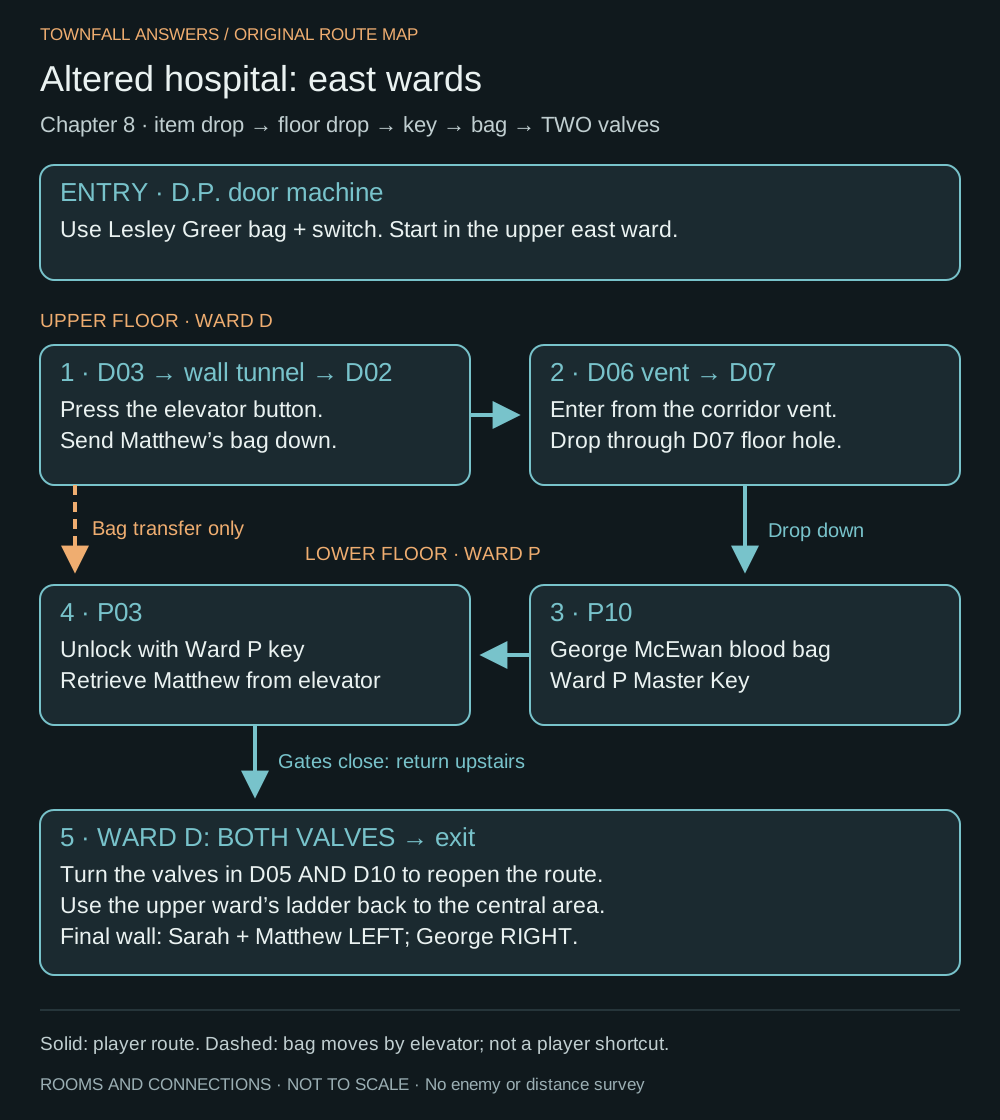
East wards: player route versus blood-bag transfer — not to scale
Original guide diagram — not an in-game screenshot. Evidence and detailed steps are listed in this guide.
Open full-size diagram- Open D.P. with Lesley’s bag. Enter D03, use the wall tunnel to D02, and press the elevator button to send Matthew’s bag down.
- Use the corridor vent into D06, continue into D07, and drop through the floor hole to P10. Take George’s bag and the Ward P key.
- Unlock P03 and retrieve Matthew from the elevator doors. The dashed map line shows the bag’s transfer, not a player elevator shortcut.
- The exit gates close after the pickup. Return upstairs and turn BOTH valves, in D05 and D10. Then use the upper ward’s ladder back to the central area. Rechecking P03 will not open the exit.
The maps show source-checked room connections and progression. Corridor shapes, distances, patrols and every optional room are not surveyed. Text directions remain available here; open either map for its full-size labels.
Which bags open which doors?
- Alan Duncan bag → place in the transfusion machine by the S.W. door, then use the switch.
- Lesley Greer bag → same treatment at the D.P. door.
How does the final wall puzzle work?
- Place Sarah Watson and Matthew Clark on the two left spots of the blood bag wall.
- Place George McEwan on the right spot.
- Use the switch left of the double doors.
- In the follow-up line puzzle, connect only O-, O+, A- and A+ to the center — the patients are T.F., H.M. and S.W. — then confirm with the ORDELL button (Ordell is Simon’s surname, per the Medical Wristband in your equipment).
Watch the final wall and line puzzle
PowerPyx’s full-game recording returns to the central wall at 56:47 and shows a Place Item prompt at the wall-mounted blood-bag unit at 57:02. These are inspected frames, not the creator’s chapter labels. Use the ward maps above for the earlier collection route. The video continues into later chapters if you keep playing.
A door will not open: follow the missing state
| Blocked point | Required state | Where to return |
|---|---|---|
| Central S.W. entrance | Alan Duncan bag inserted and machine switch used | Initial right-corridor vent route |
| W13 | Ward W Master Key, not another blood bag | W04 on the lower west floor |
| Central D.P. entrance | Lesley Greer bag inserted and switch used | W13 ladder → S12 |
| P03 / Matthew missing | Ward P key from P10; bag sent down from D02 | P10 for the key; D03 tunnel → D02 for the transfer |
| Route closed after retrieving Matthew | Both D05 and D10 valves turned | Return upstairs to Ward D |
| Final double doors | Sarah + Matthew left, George right, then the door switch | Central transfusion wall |
The elevator transfers Matthew’s bag; the player’s route uses the D07 floor hole. Do not wait at the elevator expecting it to carry you between these floors. After the final wall, the line-routing and ORDELL confirmation are still separate steps.
Evidence and onward route
This route is source-checked against PowerPyx and VGC. The two publications agree on the key dependencies, room route, two exit valves, bag placement and final compatible patient connections. The diagrams are our own route summaries, not reproductions of either publisher’s map. The compatible line types above correct the earlier over-short “O-type” summary.
Finish the Part 3 collectible sweep, then continue toward Clara Woods.
Related Articles
puzzle Verified
SILENT HILL: Townfall Infusion Puzzle — Medicine Locations & Pump Rates
St. Amelia Medical Center — Surgery room infusion pumps
puzzle Verified
SILENT HILL: Townfall X-Ray Puzzle — Skull & Chest Settings
St. Amelia Medical Center — X-Ray room
code Verified
SILENT HILL: Townfall Records Room Code (2605) & Location
St. Amelia Medical Center — Chapman Ward, Ground Floor (Records Room)
Did this guide help you?
JavaScript is needed for these buttons. You can still send a correction using the link below.
Send a correction or missing detail